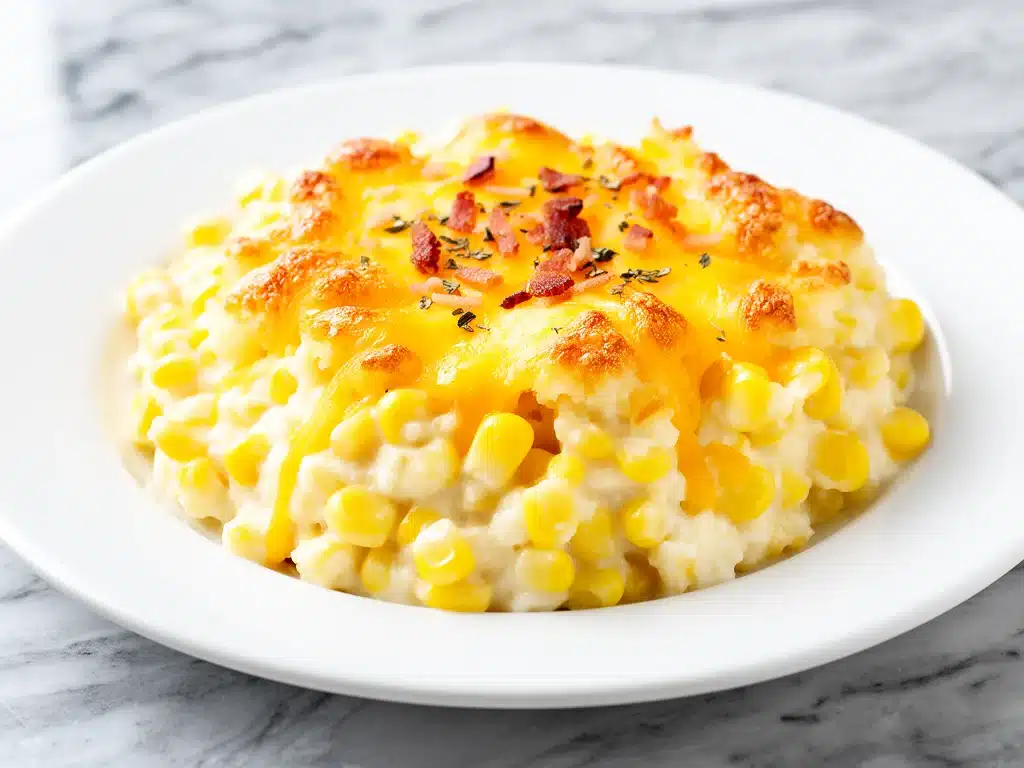
I still remember the year I accidentally brought the corn casserole to the family reunion. It was my first time cooking for more than six people, and I was nervous. I’d found this recipe in an old cookbook, something that promised “easy” and “creamy.” I assumed it would be a simple sweet corn side dish. But when I pulled that golden, bubbly dish out of the oven, the smell hit the porch before I even walked up the steps. It smelled like comfort. Like home. Like butter and cheese and warm bread.
My uncle, a man who usually only praises the brisket, stopped mid-chew and asked, “Did you make this?” I nodded, expecting a polite compliment. Instead, he asked for the recipe. Then my aunt asked. Then my cousin. By the time dessert was served, I had three people asking for seconds of the corn.
That was five years ago. Since then, this creamy corn casserole with cheddar has become my secret weapon. It’s not just for holidays anymore. I make it for Tuesday night dinners. I bring it to potlucks when I need to look like I put in effort but actually just need to relax. I make it when I want something cozy without spending hours in the kitchen.
Here’s the thing about this dish: it’s deceptively simple. You might think, “It’s just corn and cheese.” But the magic is in the texture and the balance of sweet and savory. It’s creamy enough to melt in your mouth, but cheesy enough to keep you coming back for more. I’ve tested this recipe dozens of times, tweaking the amount of cheese, the type of corn, and the baking time, until I landed on the perfect version. And let me tell you, once you try it, you’ll be making it on repeat too.
Why You’ll Love This Creamy Corn Casserole
There are plenty of corn dishes out there. But this creamy corn casserole with cheddar stands out for a few reasons. It’s not just another side dish; it’s a crowd-pleaser that works for almost any occasion. Here’s why it’s earned a permanent spot in my rotation:
- It’s Stupidly Easy — Seriously, if you can mix ingredients and pour batter into a dish, you can make this. I’ve made it while helping my kids with homework. No fancy techniques, no whisking egg whites, no tempering chocolate. Just mix and bake.
- It’s Versatile — I’ve served this alongside slow cooker apple cider pulled pork for a cozy fall dinner, and it also pairs perfectly with creamy pumpkin alfredo pasta for a vegetarian feast. It’s the bridge between sweet and savory that makes any meal feel complete.
- It’s Budget-Friendly — Corn is cheap. Canned corn is even cheaper. Cheddar is affordable. You’re feeding a family of six for under $10. That’s less than a takeout order, and it’s way healthier.
- It’s Crowd-Pleaser — I’ve served this to picky eaters, health-conscious friends, and my cheese-loving dad. Everyone loves it. The sweetness of the corn balances the sharpness of the cheddar, and the creaminess ties it all together.
- Makes Amazing Leftovers — Okay, be honest: leftovers of corn casserole rarely last more than a day. But if they do, they taste even better the next day. The flavors meld together, and the texture gets even creamier. I deliberately make extra for lunch.
This is my go-to when I need dinner to just work. No complicated techniques, no weird ingredients, just reliable, delicious food that makes everyone happy. And if you’re looking for something else to go with it, these fluffy buttermilk pancakes are a great breakfast option, but for dinner? This casserole is king.
Ingredients You’ll Need
Here’s the best part: you probably have most of this already. This isn’t a recipe that requires a trip to three different stores. It’s pantry-friendly, fridge-clearing, and forgiving. Let’s break down what you need and why each ingredient matters.
For the Base
Canned whole kernel corn (2 cans, 15.25 oz each / about 860g) — Yes, canned. I know some people swear by fresh or frozen, but canned corn gives you that consistent sweetness and soft texture that works perfectly in a casserole. I use the kind with the juice included; that liquid adds moisture and flavor. If you must use frozen, thaw it first and drain well. Fresh corn is too chunky and won’t blend as smoothly.
Buttermilk (1 cup / 240ml) — This is the secret ingredient. Buttermilk adds tang and creaminess without being as heavy as sour cream or yogurt. It also helps tenderize the corn. If you don’t have buttermilk, make your own: add 1 tablespoon of lemon juice or white vinegar to 1 cup of milk, let it sit for 5 minutes, and use it. It works just as well.
Butter (½ cup / 115g, melted) — Unsalted butter is best so you can control the salt. I use real butter, not margarine. It adds richness and helps the casserole brown on top. If you’re dairy-free, you can use a plant-based butter, but the flavor won’t be quite the same.
Granulated sugar (½ cup / 100g) — I know, it’s a savory dish, but the sugar balances the sharpness of the cheddar and the tang of the buttermilk. It’s not a dessert, I promise. You won’t taste sweetness; you’ll taste depth. If you’re watching sugar, you can reduce it to ¼ cup, but don’t skip it entirely.
For the Structure

Eggs (2 large) — These bind everything together. Without eggs, the casserole will be loose and soupy. Room temperature eggs mix better, but cold eggs work fine too. Just beat them well.
All-purpose flour (¼ cup / 30g) — This thickens the mixture so it sets properly. Don’t use almond flour or coconut flour; this recipe needs gluten to hold the structure. If you’re gluten-free, use a 1:1 gluten-free flour blend, but the texture might be slightly different.
Baking powder (1 teaspoon) — This gives the casserole a little lift, so it’s not dense. Don’t skip it. If you’re out, you can use baking soda, but add a pinch of acid (like cream of tartar) to activate it.
For the Flavor
Sharp cheddar cheese (2 cups / 200g, shredded) — This is the star. I use sharp cheddar because it has more flavor than mild. Mild cheddar will make the dish bland. Grate your own from a block—pre-shredded cheese has anti-caking agents that prevent it from melting smoothly. If you must use pre-shredded, add an extra ¼ cup to compensate for the poor melting.
Salt (½ teaspoon) — Adjust to taste. If your corn is salted, reduce this to ¼ teaspoon. Taste the mixture before baking to check seasoning.
Black pepper (¼ teaspoon) — Freshly ground is best. It adds a subtle kick that complements the cheese.
Optional Add-ins:
- Diced jalapeños (½ cup) — For a spicy kick. I add these when I want a Southwest vibe.
- Diced green onions (¼ cup) — For a fresh, oniony flavor. Add them at the end for crunch.
- Cooked bacon bits (½ cup) — Because bacon makes everything better. I add these after baking for garnish.
Equipment Needed
You don’t need fancy equipment for this. Here’s what I actually use:
9×9 inch baking dish — This is the perfect size for this amount of batter. A 9×13 dish will make it too thin, and a smaller dish will overflow. If you don’t have a 9×9, use a square dish of similar volume.
Large mixing bowl — Any size works, but make sure it’s big enough to mix everything without spilling. I use a glass bowl because I can see the consistency.
Fork or whisk — For beating the eggs and mixing the batter. A fork works fine; you don’t need a whisk for this.
Measuring cups and spoons — Standard stuff. Dollar store versions work fine.
Grater — For shredding the cheddar. Box grater or microplane works. Or food processor if you’re grating lots of cheese.
Spatula — For scraping the bowl and spreading the batter evenly.
Oven — Preheated to 350°F (175°C). Make sure it’s calibrated correctly. If your oven runs hot, check the casserole 10 minutes early.
How to Make It: Step-by-Step
Alright, let’s make this! I’m walking you through exactly how I do it, including the little tricks I’ve picked up.
Step 1: Prep Your Oven and Dish (5 minutes)
Preheat your oven to 350°F (175°C). Grease your 9×9 inch baking dish with butter or cooking spray. I prefer butter because it adds flavor and prevents sticking. If you’re using a glass dish, you don’t need to grease it, but it doesn’t hurt.
Step 2: Drain the Corn (2 minutes)
Open the cans of corn and drain the liquid. I reserve the liquid because I like the casserole to be extra juicy. If you prefer a drier casserole, drain it completely. I usually drain about half the liquid and keep the rest for later.
Step 3: Mix the Wet Ingredients (3 minutes)
In a large bowl, combine the melted butter, buttermilk, sugar, eggs, salt, and pepper. Whisk until smooth. The sugar might not dissolve completely, but that’s okay—it will melt in the oven.
Step 4: Add the Dry Ingredients (2 minutes)
Add the flour and baking powder to the wet mixture. Stir until just combined. Don’t overmix; you don’t want to develop gluten and make the casserole tough. A few lumps are fine.
Step 5: Fold in the Corn and Cheese (3 minutes)
Add the drained corn and shredded cheddar cheese to the batter. Gently fold everything together until the corn and cheese are evenly distributed. Be careful not to crush the corn kernels.
Step 6: Bake (35-40 minutes)
Pour the batter into the prepared baking dish. Smooth the top with a spatula. Bake in the preheated oven for 35-40 minutes, or until the top is golden brown and the center is set. To test if it’s done, insert a knife into the center; it should come out clean. If it’s wet, bake for another 5 minutes.
Step 7: Cool and Serve (10 minutes)
Remove the casserole from the oven and let it cool for 10 minutes. This allows it to set and makes it easier to slice. Serve warm, topped with extra cheddar, green onions, or bacon bits if you like.
Total Time: About 50 minutes (15 minutes prep, 35-40 minutes baking)
Built-in Troubleshooting:
- Casserole is too watery: You didn’t drain the corn enough, or you added too much buttermilk. Next time, drain the corn more thoroughly or reduce the buttermilk by ¼ cup.
- Casserole is too dry: You overbaked it or didn’t add enough liquid. Next time, check it 5 minutes early and add a splash of milk if it looks dry.
- Top is burning: Your oven runs hot or the casserole is too close to the broiler. Cover with foil halfway through baking.
Expert Tips & Tricks
Here’s everything I’ve learned from making this dozens of times. These tips will save you from my mistakes.
Save That Corn Liquid
Don’t throw away the corn juice! It adds flavor and moisture. I usually add ¼ cup of the liquid to the batter for extra juiciness. If you prefer a drier casserole, omit it.
Shred Your Own Cheese
Pre-shredded cheese has anti-caking agents that prevent it from melting smoothly. Grate your own from a block—takes 3 minutes and makes a huge difference. My husband can tell when I’ve been lazy and used pre-shredded.
Don’t Overmix
Overmixing the batter can make the casserole dense. Mix until just combined. A few lumps are fine.
Let It Cool
Resist the urge to cut into the casserole immediately. Let it cool for 10 minutes. This allows it to set and makes it easier to slice. It also lets the flavors meld together.
Common Mistakes (and how to avoid them):
- Mistake: Casserole is too watery — Fix: Drain the corn more thoroughly or reduce the buttermilk.
- Mistake: Casserole is too dry — Fix: Add a splash of milk or bake for less time.
- Mistake: Top is burning — Fix: Cover with foil halfway through baking.
Variations & Substitutions
Once you’ve nailed the basic version, here’s how you can mix it up. I’ve tried all of these.
Spicy Corn Casserole
Add ½ cup diced jalapeños and 1 teaspoon of cayenne pepper. This is my favorite version for game day. It pairs well with no-bake chocolate peanut butter bars for a sweet and spicy dessert.
Herb-Infused Corn Casserole
Add 2 tablespoons of fresh chopped chives and 1 teaspoon of dried thyme. This adds a fresh, herbal note that complements the cheese.
Veggie-Locked
Add 1 cup of diced bell peppers and ½ cup of diced onions. Sauté the veggies first to soften them, then fold them into the batter. This adds texture and nutrition.
Lighter Version
Use low-fat buttermilk and reduced-fat cheddar. It’s thinner but still good. I make this when I’m trying to be “healthy.” It’s not as rich, but it’s still tasty.
Dietary Modifications:
- Gluten-Free — Use a 1:1 gluten-free flour blend. Everything else is naturally gluten-free.
- Dairy-Free — Replace buttermilk with coconut milk and cheddar with dairy-free cheese. It’s different but still tasty.
- Egg-Free — Use flax eggs (1 tablespoon ground flaxseed + 3 tablespoons water per egg). The texture might be slightly different, but it works.
Serving & Storage
How to Serve:
I usually serve this straight from the dish at the dinner table—it looks rustic and stays warm. But here are other ways I’ve enjoyed it:
- Side Dishes: Serve with roasted chicken, grilled pork chops, or slow cooker apple cider pulled pork. It’s also great with creamy pumpkin alfredo pasta for a vegetarian meal.
- Toppings Bar: When I have guests, I put out: extra cheddar, jalapeños, green onions, crispy bacon bits. Everyone customizes their bowl.
- Wine Pairing: Not a wine expert, but my wine-snob friend says a crisp Sauvignon Blanc or a light Pinot Noir works great with this.
Storage Instructions:
- Refrigerator: Store in an airtight container for up to 4 days. The casserole will firm up in the fridge—totally normal.
- Reheating: Best method: Add to a skillet with a splash of milk over low heat. Stir until heated through. Microwave method: Heat in 30-second intervals, stirring between. Add a splash of milk if it’s too thick.
- Freezing: Honestly, this doesn’t freeze well because of the dairy. The texture changes when thawed. Make it fresh or store in the fridge for up to 4 days.
Pro tip: If leftovers are drying out, stir in a tablespoon of butter and a splash of milk when reheating. Brings back that creamy texture.
Nutrition Information
I’m not a nutritionist, but here’s the breakdown if you’re tracking.
Per Serving (based on 9 servings):
- Calories: 220
- Protein: 10g
- Carbs: 25g
- Fiber: 2g
- Sugar: 6g
- Fat: 10g
- Saturated Fat: 5g
- Cholesterol: 40mg
- Sodium: 350mg
- Calcium: 200mg
What’s Good:
- Decent protein from cheese and eggs
- Calcium from the cheese
- Can add vegetables to boost nutrition
What to Know:
- Higher in calories from cheese and butter
- Contains dairy and gluten
- Moderate sodium (use low-sodium corn to reduce)
My Take: Look, this is comfort food with cheese and butter. It’s not a diet recipe. But it’s way better than takeout, costs less, and I know exactly what’s in it. When I want to make it lighter, I use the low-fat version and load up on vegetables. But usually? I just eat a reasonable portion and enjoy it.
Final Thoughts
So that’s my go-to creamy corn casserole with cheddar! I’ve probably talked your ear off at this point, but when you make a recipe this often, you have a lot to say about it.
This has saved weeknight dinners more times than I can count. It’s my answer to “what’s for dinner” when I’m tired, don’t want takeout, and still want something that tastes really good. My kids are happy, my husband’s happy, and I’m happy because I’m not stressed about cooking.
Make it yours! Try different add-ins, swap in your favorite vegetables, adjust the cheese (though sharp cheddar is always better in my opinion). The best recipes are the ones you adapt to your family’s tastes.
If you make this, drop a comment and let me know what you think! I love hearing how recipes turn out in your kitchen. And if something doesn’t work, tell me that too—I’m here to help troubleshoot.
Happy cooking! And I hope your kitchen smells half as good as mine does right now.
Frequently Asked Questions
Can I use fresh corn instead of canned?
You can, but the texture will be different. Fresh corn is chunkier and less sweet. If you use fresh, cook it first to soften it, then drain well. I prefer canned for consistency, but fresh works if you’re in season.
Can I make this ahead for a dinner party?
Sort of. Mix the batter up to 2 days ahead and store in the fridge. Bake it fresh right before serving. It won’t be quite as good as fresh, but it’s close and saves you stress during the party. I do this all the time.
Why did my casserole turn out watery?
Usually means you didn’t drain the corn enough, or you added too much buttermilk. Drain the corn more thoroughly or reduce the buttermilk by ¼ cup. Also, make sure you’re not adding too much liquid at the end.
Can I freeze this casserole?
Honestly, this doesn’t freeze well because of the dairy. The sauce separates when thawed. Make it fresh or store in the fridge for up to 4 days.
Can I use mild cheddar instead of sharp?
You can, but the flavor will be milder. Sharp cheddar has more punch and balances the sweetness of the corn better. If you use mild, add extra salt and pepper to compensate.
How do I reheat leftovers without it getting dry?
Add a splash of milk or cream to a skillet, add your leftover casserole, and heat gently over low heat, stirring frequently. The extra liquid brings back the creamy texture. Microwave sort of works but tends to dry it out. If you do microwave, definitely add a splash of milk first and heat in short bursts, stirring between.
Can I double this recipe?
Absolutely! Double everything and use a 9×13 inch baking dish. The cooking time will increase by 10-15 minutes. I do this when I’m meal-prepping or feeding a crowd. Just make sure your dish is big enough for the batter—you might need to use two pans or a very large dish.
Pin This Recipe!


Creamy Corn Casserole with Cheddar
- Total Time: 50 minutes
- Yield: 9 servings 1x
Description
A simple, crowd-pleasing side dish that balances sweet corn with sharp cheddar cheese and tangy buttermilk. This easy-to-make casserole is perfect for holidays, potlucks, or weeknight dinners.
Ingredients
- 2 cans (15.25 oz each) whole kernel corn with juice
- 1 cup buttermilk
- 1/2 cup unsalted butter, melted
- 1/2 cup granulated sugar
- 2 large eggs
- 1/4 cup all-purpose flour
- 1 teaspoon baking powder
- 2 cups sharp cheddar cheese, shredded
- 1/2 teaspoon salt
- 1/4 teaspoon black pepper
- Optional: 1/2 cup diced jalapeños, 1/4 cup diced green onions, 1/2 cup cooked bacon bits
Instructions
- Preheat oven to 350°F (175°C). Grease a 9×9 inch baking dish with butter or cooking spray.
- Open the cans of corn and drain the liquid, reserving some for extra juiciness if desired.
- In a large bowl, whisk together the melted butter, buttermilk, sugar, eggs, salt, and pepper until smooth.
- Add the flour and baking powder to the wet mixture and stir until just combined; do not overmix.
- Fold in the drained corn and shredded cheddar cheese until evenly distributed.
- Pour the batter into the prepared baking dish and smooth the top with a spatula.
- Bake for 35-40 minutes, or until the top is golden brown and a knife inserted in the center comes out clean.
- Let the casserole cool for 10 minutes before slicing and serving.
Notes
For best results, shred your own cheese as pre-shredded cheese contains anti-caking agents that prevent smooth melting. If the casserole is too watery, drain the corn more thoroughly. If it is too dry, check it 5 minutes early. Letting it cool for 10 minutes helps it set for easier slicing.
- Prep Time: 15 minutes
- Cook Time: 35-40 minutes
- Category: Side Dish
- Cuisine: American
Nutrition
- Serving Size: 1 slice
- Calories: 220
- Sugar: 6
- Sodium: 350
- Fat: 10
- Saturated Fat: 5
- Carbohydrates: 25
- Fiber: 2
- Protein: 10
Keywords: corn casserole, cheddar cheese, side dish, easy recipe, comfort food, holiday sides, buttermilk corn


